-
[Airflow 기본 내용] 기본적인 DAG 작성법데이터 엔지니어링/AirFlow 2022. 6. 22. 08:13반응형
기본 DAG 작성법 순서
- module 추가
- Defulat arguments 추가
- DAG 작성(id, args, schedul_interval 등)
- Task 정의(필요에 따라 doc_md 작성 및 추가)
- Dependencies 연결
Module 추가하기
# airflow DAG 모듈
from airflow import DAG
# 날짜 관리 모듈
from datetime import datetime, timedelta
# 날짜 시간 간편하게 관리할 수 있게 도와주는 모듈
import pendulum
# 사용할 operator import
from airflow.operators.python_operator import PythonOperator
Default Arguments
default_args = {
	'owner' : 'airflow',
	'depends_on_past': False,
	'start_date' : datetime(2021,3,3),
	'email' : ['magpie@email.com'],
	'retries': 1,
	'retry_delay' : timedelta(minutes=10),
}
Instantiate a DAG
DAG 선언 세가지 방법이 있다.
- with문을 이용한 선언법
# with문으로 묵어서 DAG를 인식시키기 # airflow 2.0 은 decorator(@dag, @task)을 import 시켜 사용가능 with DAG( dag_id='tutorial', default_args={ 'depends_on_past'=False, 'email':['airflow@example.com'], 'email_on_failure':False, 'email_on_retry':False, 'retries':1, 'retry_delay':timedelta(minutes=5), }, description='묘사 내용 정의', schedule_interval=timedelta(days=1), start_date=datetime(2021,1,1), catchup=False, tags=['example'], ) as dag:- 표준 생성사로 생성 하는 방법
my_dag = DAG( "my_dag_name", start_date=pendulum.datetime(2021,1,1, tz="UTC"), schedule_interval="@daily", catchup=False, ) op = EmptyOperator(task_id="task", dag=my_dag)- @dag 데코레이터를 사용하는 방법
@dag(
start_date=pendulum.datetime(2021,1,1 tz="UTC"),
schedule_interval="@daily",
catchup=False,
)
def generate_dag():
	op = Emptyoperator(task_id="task")

dag = generate_dag()
Task 정의
BashOperator 모듈을 사용하여 () 안에 정의 하여 사용
task_id는 작업의 고유 식별자 역할을 함. flow graph에 나오는 id이기도 함
t1 = BashOperator(
	task_id='print_date'
	bash_command='date',
)

t2 = BashOperator(
	task_id='sleep',
	depends_on_past=False,
	bash_command='sleep 5',
	retries=3,
)

#jinja로 템플릿 정의하여 활용하기
templated_command = dedent(
	"""
		{% for i in range(5) %}
			echo "{{ ds }}"
			echo "{{ macros.ds_add(ds, 7) }}"
		{% endfor %}
	"""
)

t3 = BashOperator(
	task_id='templated',
	depends_on_past=False,
	bash_command=templated_command,
)
DAG 문서 작성 및 추가
dag_md라는 객체를 활용하여 문서화 하는 작업을 할 수 있음
t1.doc_md = dedent(
	"""
		doc_md 는 markdown으로 작성한 문서임
		### 마크다운도 사용가능
		속성 'doc_md'를 사용하여 문서작업 가능
		'doc' : plian text,
		'doc_rst',
		'doc_json',
		'doc_yaml',
		과 같은 문서도 사용가능
		doc은 ui에 Task Instance Details page에 렌더링 되어 보여짐
	"""
)

dag.doc_md = __doc__
dag.doc_md = """
	dag객체에 doc_md속성을 이용하면 dag에 속한 모든 곳에 doc이 표시됨
"""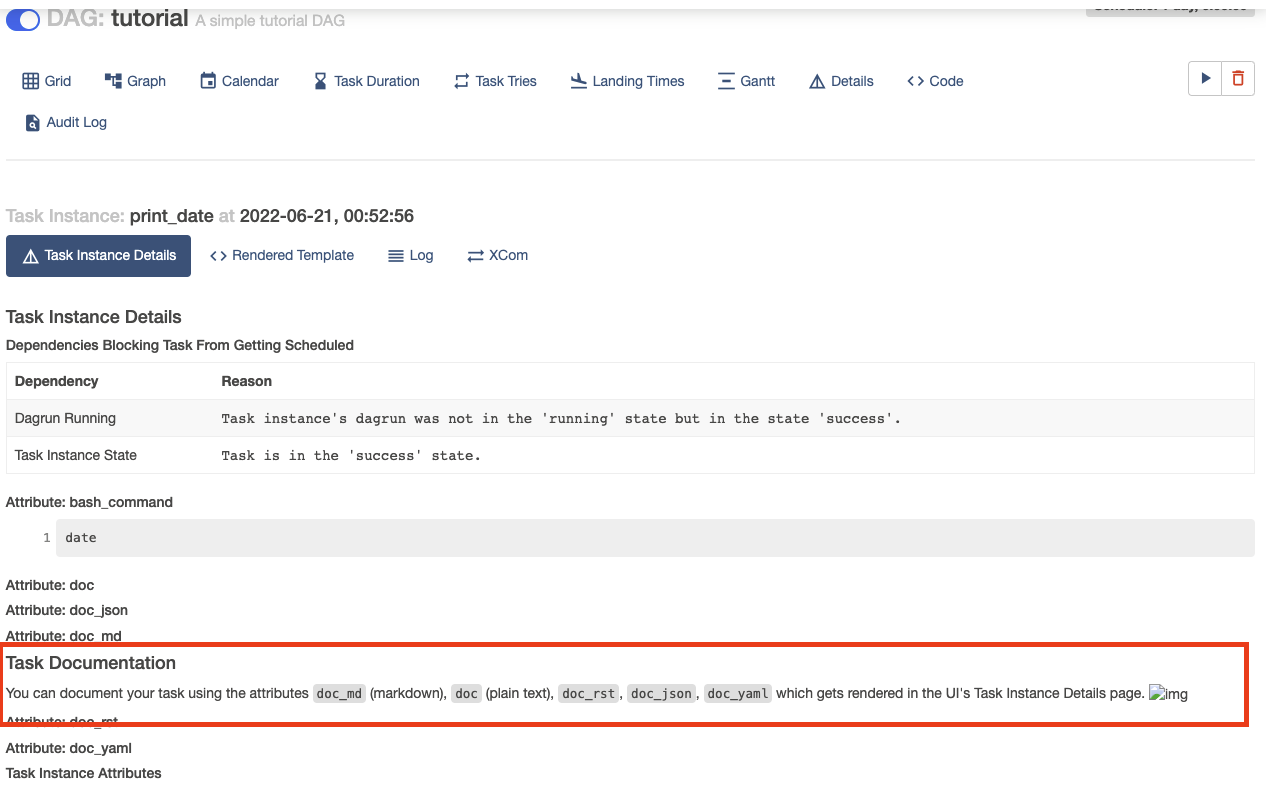

Dependencies 설정
# downstream 함수로 flow 그리기 가능
t1.set_downstream(t2)

# upstream 함수로 flow 그리기 가능
t2.set_upstream(t1)

# downstream 함수를 >> 로 대체 가능
t1 >> t2

# upstream 함수를 << 로 대체 가능
t2 << t1

# downstream을 연속적으로 표시하면 t1 끝나면 t2 끝나면 t3로 종송석 설정 가능
t1 >> t2 >> t3

# 배열로도 할당 가능
t1.set_downstream([t2, t3])
t1 >> [t2, t3]
[t2, t3] << t1
Summary
from datetime import datetime, timedelta from textwrap import dedent # The DAG object; we'll need this to instantiate a DAG from airflow import DAG # Operators; we need this to operate! from airflow.operators.bash import BashOperator with DAG( 'tutorial', # These args will get passed on to each operator # You can override them on a per-task basis during operator initialization default_args={ 'depends_on_past': False, 'email': ['airflow@example.com'], 'email_on_failure': False, 'email_on_retry': False, 'retries': 1, 'retry_delay': timedelta(minutes=5), # 'queue': 'bash_queue', # 'pool': 'backfill', # 'priority_weight': 10, # 'end_date': datetime(2016, 1, 1), # 'wait_for_downstream': False, # 'sla': timedelta(hours=2), # 'execution_timeout': timedelta(seconds=300), # 'on_failure_callback': some_function, # 'on_success_callback': some_other_function, # 'on_retry_callback': another_function, # 'sla_miss_callback': yet_another_function, # 'trigger_rule': 'all_success' }, description='A simple tutorial DAG', schedule_interval=timedelta(days=1), start_date=datetime(2021, 1, 1), catchup=False, tags=['example'], ) as dag: # t1, t2 and t3 are examples of tasks created by instantiating operators t1 = BashOperator( task_id='print_date', bash_command='date', ) t2 = BashOperator( task_id='sleep', depends_on_past=False, bash_command='sleep 5', retries=3, ) t1.doc_md = dedent( """\\ #### Task Documentation You can document your task using the attributes `doc_md` (markdown), `doc` (plain text), `doc_rst`, `doc_json`, `doc_yaml` which gets rendered in the UI's Task Instance Details page.  """ ) dag.doc_md = __doc__ # providing that you have a docstring at the beginning of the DAG dag.doc_md = """ This is a documentation placed anywhere """ # otherwise, type it like this templated_command = dedent( """ {% for i in range(5) %} echo "{{ ds }}" echo "{{ macros.ds_add(ds, 7)}}" {% endfor %} """ ) t3 = BashOperator( task_id='templated', depends_on_past=False, bash_command=templated_command, ) t1 >> [t2, t3]DAG 실행해보기
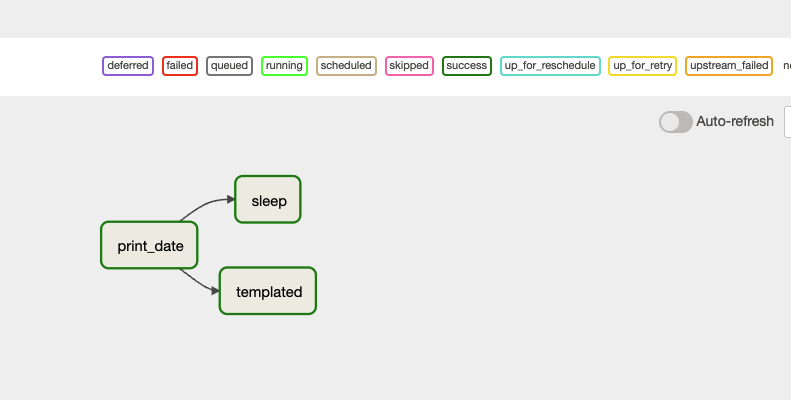
실행을 해보면 모든 task가 색이 변경 된 것을 알수 있음. 아래 그림은 print_date는 성공으로 표시sleep이 running 실행중이라는 것을 뜻하며 templated는 queued 큐가 오길 기다리는 중으로 나옴

Dag Graph 오른쪽 상단에 색이 변경되면 어떤 의미 인지 확인 가능
 반응형
반응형'데이터 엔지니어링 > AirFlow' 카테고리의 다른 글
[Airflow 실습]가장 기본 DAG 만들어 실행해보기 (0) 2022.06.22 [Airflow 기본 내용] DAG 작성 심화 (0) 2022.06.22 [Airflow 기본 내용] Operator, task란? (0) 2022.06.22 [Airflow 기본 내용] Airflow란? 구성요소, 구동원리, 개념, 용어 정리 (0) 2022.06.21 [Airflow 설치방법] Airflow Conda 환경에서의 설치 방법 (0) 2022.06.21