-
python 패키지 관리를 위한 poetry 패키지 매니저 활용법프로그래밍/Python 2024. 5. 4. 13:10반응형
Poetry란?
- python에서 사용하는 패키지 매니저임
- python 개발시 협업을 진행하기 위해 패키지를 맞춰야 하는데 유용함
- python 패키지 setup하는 용도로도 사용함
- python lint, flake8에서도 유용한 작용을 함
- 자바와 maven gradle과 같은 기능이라고 보면 됨
- 또한 개발과 배포용에서 굳이 배포 하지 않아도 되는 flake8 같은 패키지는 개발과 배포용으로 구분하여 패키지 관리도 진행 가능하다.
Poetry 버전 확인
—version으로 버전 확인 후 없으면 설치 하면 된다.
# 버전 확인
poetry --version
# Poetry (version 1.8.2)

# 설치
pip install poetry
Poetry로 python 패키지 생성
poetry init
# or
poetry new lm2-server --src
# src를 기준으로 패키지화 한 프로젝트 생성
# Created package lm2_server in lm2-server
poetry는 toml파일안에 config형식으로 프로젝트를 관리하게 된다.
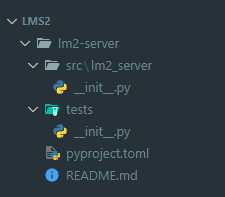
# pyproject.toml
[tool.poetry]
name = "lm2-server"
version = "0.1.0"
description = ""
authors = ["Eddie ~~@users.noreply.github.com>"]
readme = "README.md"
packages = [{include = "lm2_server", from = "src"}]

[build-system]
requires = ["poetry-core"]
build-backend = "poetry.core.masonry.api"
패키지 추가
poetry는 pyproject.toml이 있는 경로에서 사용하여야 패키지를 추가 할 수 있다.
# 배포용
poetry add flake8 psycopg2-binary
# 개발용
poetry add --dev flake8 psycopg2-binary
아래와 같은 형식으로 dependencies아래에 패키지가 추가가된다.
# pyproject.toml
[tool.poetry]
...

[tool.poetry.dependencies]
python = "^3.12"
flake8 = "^7.0.0"
psycopg2-binary = "^2.9.9"

[tool.poetry.group.dev.dependencies]
flake8 = "^7.0.0"
psycopg2-binary = "^2.9.9"

[build-system]
...
dependencies에 추가가 되면 poetry.lock파일이 생성이 되며, 그 안에 node.js, yarn.lock같은 config파일이 생겨 동일한 개발환경을 유지 할 수 있게 해준다.
패키지 삭제
poetry remove flake8
# Updating dependencies
# Resolving dependencies... (0.1s)

# Package operations: 0 installs, 0 updates, 4 removals

#  - Removing flake8 (7.0.0)
#  - Removing mccabe (0.7.0)
#  - Removing pycodestyle (2.11.1)
#  - Removing pyflakes (3.2.0)

# Writing lock file
update
의존성 패키지의 버전을 업데이트하고 poetry.lock 파일을 업데이트 한다.
# 패키지 업데이트
poerty update
# 하나씩 지정해서 업데이트도 가능
poetry update requests toml
# 업데이트는 하지 않고 poetry.lock 만 업데이트
poerty update --lock
가상환경 생성 및 활성화
poetry는 패키지 관리 뿐만 아니라 가상환경도 생성하고 쓸수 있다. 패키지 설치는 poetry install명령어로 패키지 설치를 할 수 있으며 poetry shell명령어로 가상환경을 activation 할 수 있다.
# poetry에 명시된 패키지 설치
poetry install

# poetry에 명시된 패키지 설치
poetry install

# 가상환경 만들기
poetry env use python
# Creating virtualenv lms-E0bNJbhg-py3.11 in C:\Users\USER\AppData\Local\pypoetry\Cache\virtualenvs
# Using virtualenv: C:\Users\USER\AppData\Local\pypoetry\Cache\virtualenvs\lms-E0bNJbhg-py3.11

# 가상환경 활성화
# 위에서 가상환경을 만들었다면, python3.11로 실행 된다
poetry shell
# Spawning shell within C:\Users\USER\AppData\Local\pypoetry\Cache\virtualenvs\lms-E0bNJbhg-py3.11

# 가상환경 존재 하지 않을 때
poetry shell
# Creating virtualenv lms-E0bNJbhg-py3.12 in C:\Users\USER\AppData\Local\pypoetry\Cache\virtualenvs
# Spawning shell within C:\Users\USER\AppData\Local\pypoetry\Cache\virtualenvs\lms-E0bNJbhg-py3.12

# ~> ()
린팅 추가
python 린팅에 관련된 패키지 flake8, Black, 클린코드에 관련된 내용을 정의해서 사용 할 수 있다. poetry add --group dev black flake8 를 실행 하고 pyproject.toml에 아래 설정값을 파일에 추가하면 된다.
poetry add --group dev black flake8# 아래 섹션은 black의 설정 [tool.black] line-length = 88 target-version = ['py38'] include = '\\.pyi?$' exclude = ''' /( \\.git | \\.mypy_cache | \\.tox | \\.venv | _build | buck-out | build | dist )/ ''' # 아래 섹션은 flake8의 설정 [tool.flake8] ignore = "E203, E501, W503" max-line-length = 88 exclude = ".git,__pycache__,docs/,old/,build/,dist/"이렇게 추가했으면 아래 명령어로
# black 실행
poetry run black .
# flake8 실행
poetry run flake8
필자는 vscode를 사용하기 때문에 자동으로 린팅이 되었으면 좋겠어서, .vscode를 생성하고 settings.json 파일을 생성한 다음 아래의 설정값을 넣어주면 save시 자동으로 린팅이 되게 된다.
{
    "python.linting.enabled": true,
    "python.linting.flake8Enabled": true,
    "python.formatting.provider": "black",
    "python.formatting.blackArgs": [
        "--line-length",
        "88"
    ],
    "[python]": {
        "editor.formatOnSave": true,
        "editor.codeActionsOnSave": {
            "source.organizeImports": true
        }
    },
    "python.linting.flake8Args": [
        "--ignore=E203,E501,W503",
        "--max-line-length=88"
    ]
}
build
소스를 배포가능한 형태로(tarball, wheel)빌드한다.
poetry build실행 시 아래 dist 폴더와 소스코드가 zip이 되게 된다.
publish
아래 명령어로 PyPI에 배포할 수 있다.
poerty publish배포를 하려면 PyPI 계정이 필요하다. 계정이 없다면 프로젝트명이 겹치면 배포를 할 수 없으니, 프로젝트 명을 정해서 배포를 해야한다.
export
export 명령어는 lock 파일을 사용해서 다른 의존성 포맷으로 변경할 수 있다.
poetry export -f requirements.txt > requirements.txt반응형'프로그래밍 > Python' 카테고리의 다른 글
Alembic 사용법 (python data migrations) (0) 2024.05.05 python pyenv로 가상화 환경 만들기 (0) 2024.05.04 python property 사용하기 (0) 2022.03.12 [python] return에서 or/and 연산자 사용법 (0) 2021.06.17